Tuesday, September 15, 2015

Nux Redux

Been busy trying to keep my head just above water so nothing new has been in the pipeline. However, I did manage to finally upgrade my Nux bobble-bird from Fury Road to something more looking like the movie.

Behold, sinners.


Saturday, June 6, 2015

Oh, What a Day! What a Lovely DAY!!

Yep, still alive. Just been working on some things to make that skrilla. This be one of them.

Been working on this for a couple weeks or so, especially after since my second viewing of Fury Road (that movie is perfect).

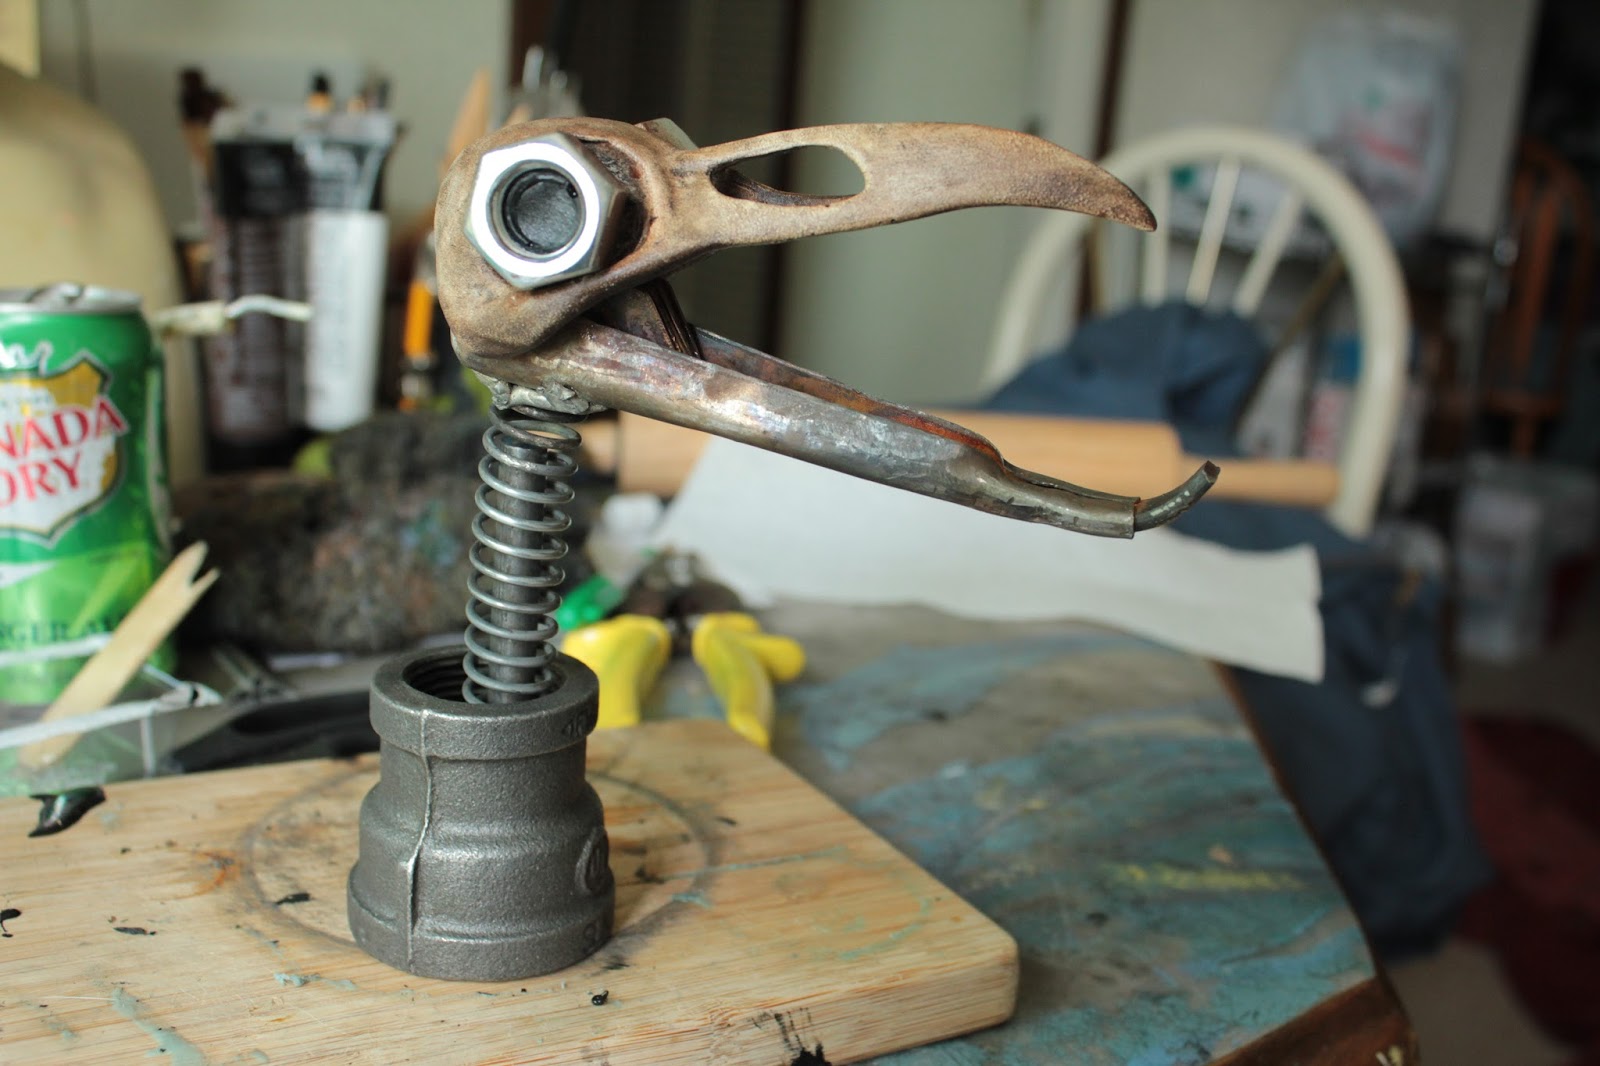
I'm talking about Nux's bird skull bobble head!

It's sculpted originally from Super Sculpey and then heavily altered later with Apoxie sculpt. Then it was cast in resin after it was all spiffy. Then cleaned and painted accordingly. Unfortunately, the mold putty I had to use shrank the skull by around 4-5% and added some distortion, so there was a lot more clean up to it than I originally hoped for. It also made the eyes look even more comically large.

The Lower jaw was a real pain. Having the most basic of hand tools, I had to hand cut, hand bend, and hand crimp the weld plate to what I think the jaw looks like. The mouth greeblies were done in a similar fashion (but out of copper) and they were all soldered together. Oxidation and rust is all real, when it came to the jaw, nature took care of the look for me.


"Eyes" were attached with resin castings of a threaded rod I had intended to cut up. After doing a lot more sawing, hacking, and cutting that I expected; I just said "Fuck it" and decided to go the easier route. The most laborious thing about this was having to drill the hole into the cast skull to fit the sanded down screws.


The spring was cut to size and soldered (sloppily, too, might I add) to the lower jaw after I drilled a hole into it. What you see in these later images, when it's crimped, is the third jaw I made. The first two were made just to get a technique down.

Looking at pictures of the real thing now, the spring is still too long and sticks too far away from the neck.

Once that was all done, I screwed the jaw to the skull to make sure it stayed and was sturdy. Cut the guide rod to size and then plopped into the plumbing coupler-thing I picked up at the hardware store (closest thing I could find), and then filled the bottom with resin.

After sanding the bottom smooth, I realized that because of how far the "neck" extends, and just how the base is, it topples over when it bobbles; so I have to hold the base to have it bobble. I was so intent on having it look like the movie that I overlooked that it might need some wider base or flange to keep steady. Once again, I have paid the price for my lack of vision.


Still a bunch wrong with it but I'm happy with it... Until I make another one, that is.


EDIT: 06/07/15 - I'm open to a few orders for these on my Etsy shop, for those inclined.

Tuesday, January 20, 2015

DOFP Magneto Bucket FINISHED!

Here it is in all its glory! Painted with copper, brown, red-metallic, "berry wine" acrylics over a base of brass paint and sealed with a satin finish.

I normally don't like to boast or brag about anything I do, but this is quite possibly the most accurate fan reproduction of this helmet available (or soon to be) but that's not saying that anyone would care. 

Marvel in her majesty!


Monday, January 19, 2015

The Penultimate Update Post for Magneto's Bucket

I'm applying sealant to my buckets (yes, I made two!), or rather, letting the sealant dry while I'm typing this. Can't wait to show off what all this turmoil and tumult has lead to in the next post but, as it is, here's some stuff to catch up on:

1) Molding: Did it the way I typically mold things. Silicone and fiberglass "paste" from Smooth-On. Only thing I did this time was separate the fiberglass jacket into three pieces so it would be easier to put together and take apart.


Here's a pic of what it looks like on the inside with the nose plugged up. I was so proud removing this from the sculpt because it came off like a dream and all the details were there; no bubbles, no troubles. The original sculpt even survived unscathed! A rarity for me!


2) Casting: Mixed up some resin and pulled out two casts. One to test paints and color scheme and another to apply final applications to. 


The details captured are all there and it's all sharp and clean. The only hick-up was in the second cast as there were some air bubbles caught in some of the details and left some pockmarks. A result of what happens when resin cures too fast before settling into the finer details.


Up next: RESULTS!

Tuesday, January 13, 2015

A Little Bit More, Now

Alright, maybe not quite directly into molding the thin because I decided to refine a few things before that step.

Firstly was the emblem in the front. I reduced the flare of the wings and added these little hooks that come from them where they meet the arms. Also, I tapered them more at the connection.


Then refined the ears, making them thinner like they're seen in the movie, extending to the underside of the bucket. Adding the undercut to keep it thin when I mold it.


The back got some touching up, too.


Here's where it's at currently: filled in the face and kept the nose for a registry key and then about three layers of silicone on it right now. I think one more layer and then the registry keys and then onto the fiberglass mother mold.